


How To Grow Tropical Hibiscus
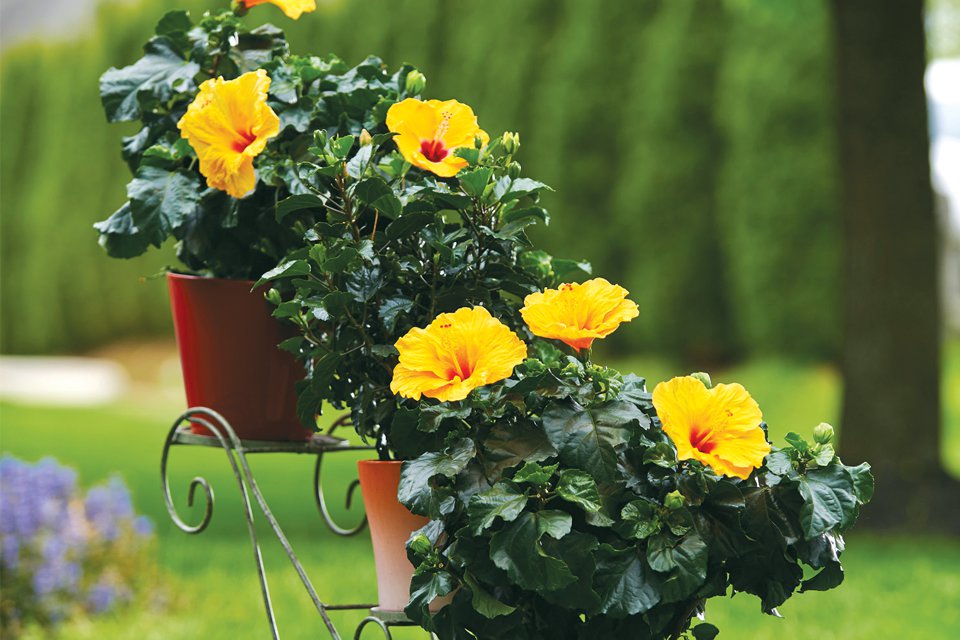
Hibiscus Tahiti Wind Curacao Wind
Tropical Hibiscus bring the allure of an island paradise to outdoor living spaces with their oversized blooms in single and double-flower forms that come in fluorescent red, orange, yellow and pink colors. Energy-driven Hibiscus require high light and warm temperatures for fastest crop times and full, quality pot plants. Northern, Northwestern, Middle Atlantic, Midwestern and Canadian growers should start production in March through June for best results. Southern, Southwestern and Southern California growers can mostly produce year-round with their higher light and temperature.
Uses
Tropical Hibiscus liners can be used to produce 4½-, 6-, 8-, 10- or 12-inch pots for use as house plants, window boxes and landscape applications. Although tropical Hibiscus are not winter hardy in Northern or Midwestern climates, they will thrive outdoors in southern locations where winter temperatures rarely drop below 50°F.
Planting

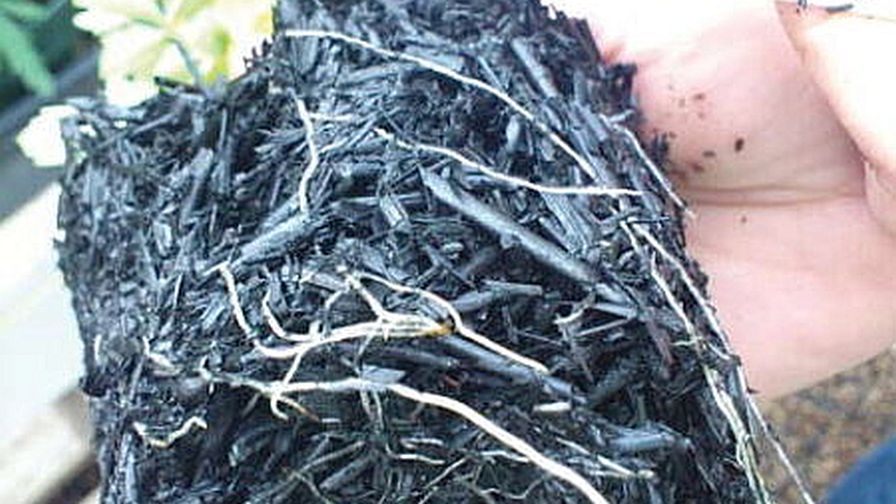
When planting one- or two-cutting liners, remove liners from the holding strip by pushing up from the bottom. Plant just deep enough to cover the surface of the liners with media. Water thoroughly, and apply water directly to the liners to keep them wet until new roots are established. Monitor dryness of the liners for three to four days after planting.
Root Medium And Irrigation
Use a well-aerated mix but be sure that sufficient moisture can be retained, since plants should never be allowed to wilt. Wilting will cause leaf yellowing and loss, as well as flower bud drop. Most commercial root media should be satisfactory. Soilless root media pH should be 5.5 to 6.2. As with all potted plants, water quality (e.g., alkalinity, nutrient content, etc.) should be known to evaluate the potential effects on plant nutrients.
Fertilization
To get plants off to a fast start and maximize breaking action, start off with a constant feed of 300 to 400 ppm nitrogen for one to two weeks, then cut back to 200 ppm. Use a complete fertilizer that has the majority of nitrogen as the nitrate form and contains extra micronutrients, as in the Peat-Lite Specials. Example formulas are 20-10-20, 15-11-29, 15-16-17, 20-19-18, etc.
During periods of rapid growth after start-up, 400 ppm nitrogen may again be needed to maintain proper leaf drench applications of epsom salts (magnesium sulfate) at 8 ounces per 100 gallons every six weeks to prevent lower leaf interveinal chlorosis. Water-soluble iron products such as Iron Sequestrene or Sprint 138 can be used as instructed to alleviate iron deficiency if roots are healthy.
Liquid feeding is best for Hibiscus. However, if controlled-release fertilizers are used, it is best to be used in combination with liquid fertilizers. Controlled-release fertilizers tend to release best when temperatures are about 70°F. When cooler than this, less nitrogen is available to young plants. During very high temperature periods, the release can be greater than desirable for plant growth.
Light And Temperature
Tropical Hibiscus like TradeWinds require maximum available light with 65˚F to 70˚F night temperature and 75˚F to 85˚F day temperature for fastest production and best quality. Lower temperatures delay and stunt plant growth. Low light results in fewer branches, fewer flowers, stretched plants and longer crop time. Bud development will not occur at temperatures below 55˚F, and chilling injury can occur if temperatures drop below 50˚F for an extended period of time.
Pinching And Early Bud Removal
The number of pinches needed to create rounded, bushy plants depends on the container size, number of plants and desired plant size. The first pinch is made when plants are established, usually 10 to 17 days after planting.
Pinches should be made in semi-hard wood for optimum breaking action. Soft new growth should be removed. Pinching into soft wood reduces breaking action and encourages premature budding.
Pinches should be made whenever plant height exceeds plant width. Under ideal growing conditions there will be three to four weeks between pinches. This time will be greatly extended under lower light and temperature. The final pinch should be given nine to 12 weeks prior to sale.
Sometimes premature buds may be seen during the beginning of forcing on liners. Simply remove these buds from leaf axils for the first three to four weeks after forcing begins, to focus the plant’s energy into growth instead of flower development.
Spacing And Growth Regulators
Plants can be kept nearly pot-to-pot until the final pinch is given as long as leaves from adjacent plants do not overlap. Final spacing should be given right after the last pinch. Refer to the Scheduling section for spacing guidelines.
Under good growing conditions, plants may stretch excessively between pinches or after the final pinch, and will require growth regulators to control this stretch. Cycocel and Bonzi are both labeled for use on Hibiscus. Cycocel is more commonly used since it controls height and also helps provide uniform bud set.
Pest And Disease Control
Common pests for hibiscus are whiteflies, aphids and spider mites.
There are few disease problems. Avoid overhead watering to prevent occasional bacterial or fungal leaf spot diseases. Basal stem and root rot from Phytophthora can be a problem. Chipco, Aliette or Heritage drenches after planting are useful for control of this fungal disease.
Before using any pesticides, be sure they are registered for use. Follow label directions. The label is the law.
Bill Aulenbach and the production team of Aris Keepsake Plants produced this article, based on 30 years of breeding and producing Tradewinds Hibiscus.
Subscribe to eNewsletter