


Hydrangea Production Pointers From Propagation to Finishing

 October 26, 2023
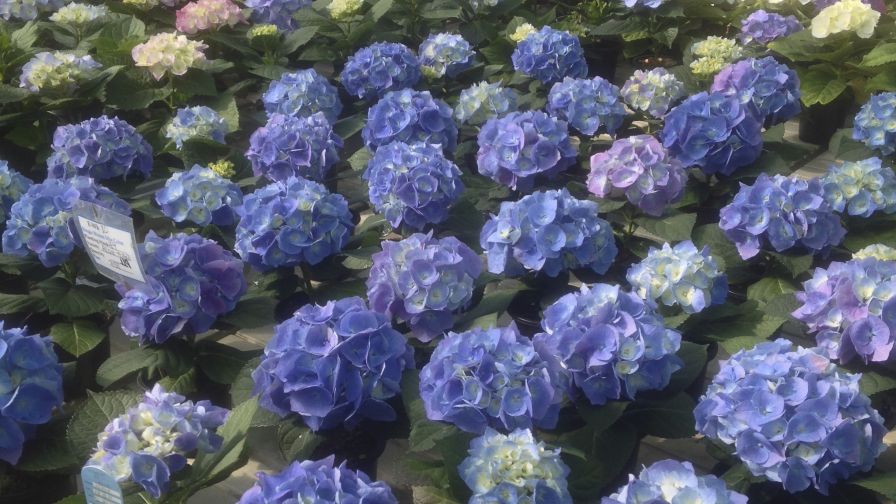
Hydrangea Topaz Sky (Photo: Syngenta Flowers)
Potted hydrangeas are a popular spring crop that bring a burst of color to any home after a long winter. For growers, knowing the fundamentals of the hydrangea crop cycle and how to finish the crop is vital for producing a quality crop that will brighten anyone’s day.
Hydrangea production can seem straightforward at first glance, but upon closer look, producing this crop has multiple steps that begin almost a year and a half before the plants reach consumers. The production cycle looks deceptively simple because most growers purchase pre-cooled plants that come as dormant canes. These pre-cooled plants are forced in a greenhouse, and a grower typically needs only to manage the finishing environment, fertility, height, and pests to produce a high-quality crop; but as covered later in this article, finishing hydrangeas requires more than one might expect.
From the Propagator to the Grower
A hydrangea crop usually starts at a specialty propagator who ships in unrooted cuttings from a breeder. The specialty propagator will grow the crop for over a year to prepare the plants for forcing by the finish grower. Propagation typically begins in late January of the year before the eventual sale of the finished flowering crop. Soft cuttings are harvested from stock plants like any other vegetatively propagated plant. Cuttings are typically rooted in 50 or 70-cell trays due to the large size of the cuttings.
The time between when the cuttings have rooted and when the finish grower receives the dormant plants is critical to “program” the crop. How well the plants are managed for the next 40-plus weeks directly impacts the finish quality of the crop as it pertains to the number of branches, floral initiation, and in the case of blue cultivars, the intensity of the finish color. In North America, these steps are typically done by the propagator.

Once the liners are transplanted and putting on growth, growers should pinch to promote branching. They may be pinched multiple times, but the final pinch will occur about 12 to 13 weeks after transplanting. The number of pinches will ultimately determine the number of branches and the number of blooms on the plant after forcing. Blue varieties will have up to eight applications of aluminum (usually in the form of aluminum sulfate) applied to them. This has a two-fold effect; it lowers the substrate’s pH, making aluminum highly available to the plant and increasing the aluminum level in the media to ensure sufficient quantities are available for uptake.
The last step a propagator must accomplish before the plants are ready to be forced by the finish grower is to meet the dormancy requirements of the crop. According to Dole and Wilkins (2005), plants should cool to 40 to 45˚F for at least 1,000 hours. Plants should be defoliated with a chemical aid just before cooling, or the plants will naturally defoliate while receiving their cold treatment. Either way, care needs to be taken to clean dropped leaves out of the pots to prevent disease. If cold storage is extended, temperatures may drop as low as 33 to 35˚F. Plants can be shipped to the finish grower once the cooling requirement has been met.
Moving to Finishing
After the liners have completed their six weeks of cooling (or 1,000 chilling hours), they are ready to move on to the finish stages of production. While finished production can occur in any number of container sizes, for this article, we will focus on the most popular size which, is a 6.5-inch container. To force a container with three to four blooms, the optimal liner size is a 4 to 4.5-inch dormant liner. It will take roughly 8 to 11 weeks to finish a 6.5-inch container from a 4.5-inch liner. Hydrangeas can be forced from a dormant liner year-round, so the market date that will determine when to transplant the dormant liner into the finial container. For example, if the goal is to finish the product for Valentine’s Day, transplanting will occur around mid-December. For a crop to finish for Mother’s Day, liners must be received and transplanted mid-March.
Take care when transplanting to ensure the liner is planted into the center of the finished container. Plant at a depth so that the liner soil line is even with the soil level in the finished pot; do not bury the crown of the starter material. Use a well-drained potting media and avoid heavy, poorly drained mixes. While Hydrangeas require ample irrigation and moisture, they do not grow well in overly saturated media. The desired flower color will dictate media pH and lime rates. For pink, red, or white varieties, a pH value of 6.0 to 6.2 is needed. To produce blue flowered plants the pH values, need to be lower between 5.0 to 5.5. For growers blending their own media (especially those growing, blue-flowered varieties) adequate gypsum should be incorporated into the media to supply calcium without raising the media pH.
After transplanting is completed, the container can be placed pot-tight in the greenhouse to conserve heat, then spaced after two to four weeks. Or they can be set down at their final spacing. Irrigation should be supplied preferably by using drip tape, drip emitters, or other irrigation forms that allow the foliage to stay dry. Air temperature should be kept around 72 to 74°F during the day and 60 to 62°F at night for an average daily temperature of 68°F. Cooler temperatures will help to regulate the overall height, but keep in mind that it will lengthen crop time. Hydrangea do not require daylength extension, but supplemental lighting can be beneficial. Try to maintain levels between 800 and 1,200 µmol.m-1.sec-1.
Getting the Right Color
Hydrangeas in general, are moderate feeders and require a PourThru electrical conductivity (EC) level be maintained around 2.3-3.2 mS/cm (SME (Saturated Media Extract) EC values of 1.5-2.1). Nitrogen rates of 175 to 200 ppm should be provided at the start of forcing, but as the flower sepals start to show color, rates can be reduced. As mentioned earlier, pH and to an extent the fertilizers used play a key role in determining the color of the flowers. The sepals (the individual flower petals) of a hydrangea contain a red anthocyanin pigment that will turn blue upon reacting with certain metals, including aluminum. As a result, the more aluminum available for the plant to uptake, the bluer the petals become. If the aluminum levels are mismanaged a Hydrangea will start to express an undesirable bluish-purple color. Therefore, it is essential to know that Aluminum availability increases as the pH values of the media drop below 5.5 to 5.0.
If the desired flower color is blue, the media acidity must be maintained at the 5.0 to 5.5 pH level using aluminum sulfate drenches at a rate of 8 to 10 pounds per 100 gallons. The initial drench is typically applied at 7 to 10 days after transplant. After the initial drench, aluminum can be reapplied every 10 to 14 days as needed to maintain the media acidity and provide the aluminum needed to ensure a blue sepal. Be aware that if the irrigation water is acidified, to control bicarbonate levels, avoid using phosphoric acid. Phosphorus will limit aluminum availability, so utilize sulfuric or nitric acids to acidify the water. Phosphorus can also be found in the fertilizers used. To safeguard against increased phosphorus levels, rely on the following formulations, 14-0-14, 13-2-13, and 15-0-30. The elevated potassium in these formulations also ensures a clear blue color.
When the desired outcome is a pink, red, or white hydrangea, a media pH between 6.0-6.2 is necessary. Alkaline soils will limit the amount of available aluminum and ensure a bright pink sepal. This can be accomplished by first amending the potting media with sufficient calcitic or dolomitic limestone levels. As alluded to earlier, phosphorus directly affects aluminum availability in the media, so incorporating an adequate amount of triple phosphate in the mix can be beneficial. Choosing fertilizers that are high in phosphorus and low in potassium like, 15-30-15, will also defend against increasing aluminum accessibility. An alternative to using this formulation is to alternate between calcium nitrite and ammonium phosphate fertilizers. If the media pH should rise above 6.5, the plants might experience iron deficiency. A symptom of iron deficiency would be bronzing of the edge of the leaf. Drench plants with an iron-chelate (ex. Sprint 138 or 330) at 2 oz/100 gal to correct the nutrient disorder and repeat two weeks later if necessary.
Bottom line, if a blue flowered hydrangea is the goal, grow it at a pH of 5.0 to 5.5 maintaining low phosphorus and high aluminum levels. If a pink, red, or white flowered hydrangea is the desired flower color, grow at a pH of 6.0 to 6.5 maintaining high phosphorus, high iron, low aluminum, and low potassium levels.
Managing Height
If adequate space is given, plants are grown cool, and not over-fertilized, a hydrangea’s height can be controlled utilizing the environment. As crop schedules move later in the season applications of daminozide (B-Nine WSG (Water Soluble Granule)) at 2,500 to 5,000 ppm may be required. For more aggressive varieties or growing environments where a high degree of control is needed, paclobutrazol (Bonzi) sprays at 50 ppm can be applied. All plant growth regulators (PGRs) need to be terminated when flower buds reach ¾ of an inch in diameter; if not, there is a risk of reducing the overall flower size. Like poinsettia production, graphical tracking can be a valuable tool to help estimate the number of inches needed every week to satisfy the height requirements of the finished crop. If a crop is tracking shorter than the desired height, sprays of gibberellin (Fascination) at a rate of 3 to 5 ppm can be applied to increase internode length. Applications of gibberellin like PGRs need to be made before flowers reach the size of a dime, or you risk affecting plant quality.
Managing Pests
Hydrangeas will remain relatively pest-free when the correct growing environment is provided. Proper spacing to allow for adequate air flow will prevent high humidity from building up in the plant canopy, creating a favorable environment for either botrytis or powdery mildew. Correct spacing will also make it easier to scout the crop regularly during production for insects. Under warmer growing temperatures, common pests to watch for are aphids, spider mites, and thrip. Slugs and snails can also be an issue if forced on gravel floors or outdoor beds. It is possible to find hydrangea ring spot virus, but unlikely if purchasing cuttings/liners from reputable sources.
As the crop nears the end of production, the adage of using flower size to time market readiness holds true. Flower buds will be pea-sized eight weeks before sale, nickel-sized six weeks before sale, and half-dollar-sized four weeks before sale. Use these markers and the graphical track mentioned above to determine when to lower production temperatures and fertility rates. These actions should begin roughly two weeks prior to finish, so at the half-dollar-sized bud mark. By making these reductions, it will improve post-harvest shelf life and make the colors of the sepals more vivid. Throughout production, ensure that the hydrangeas are not allowed to wilt, as it can cause irreversible damage. To ensure that this does not happen during transit, a media drench with a wetting agent right before the plants are shipped has been proven to be effective.
Hydrangeas continue to become increasingly popular with consumers every year. With their extremely showy and long-lived blooms, it is no surprise to understand why. Despite the challenging production requirements, hydrangea can be a very profitable crop to help kick off the spring season or to help bolster holiday sales. Hopefully, the steps outlined in this article have demystified hydrangea production to the point where you are willing to add it to your next spring rotation.
Subscribe to eNewsletter